This, however, isn’t as dependable as the knowledge that comes with actually learning what you want to know. Matters like car wiring are very fragile.
Making a mistake in the actual car wiring application can cause serious problems. That’s why we’re here to talk about proper DIY car wiring tips today.
DIY car wiring reminders
Before starting any DIY electronics project, make sure you have all the right tools and supplies gathered. Regardless of what electronic device it is you’re working on, here are the standard tools you’ll need:
- Crimping tool or soldering iron
- Wire strippers
- Digital multimeter
- Butt connectors or solder
- Proper gauge wire
- Heat shrink or electrical tape
1. Checking the circuits
If you have a wiring diagram with you, you can use that to find wires that you’ll need for your DIY project. However, it is still recommended that you make use of a digital multimeter or a DMM.
This can effectively determine whether you have the correct wires. Use the DMM to check the wire’s circuit polarity. You will also want to make sure that there is a proper voltage.

It is recommended that you make use of a digital multimeter or a DMM
A test light can also do the trick. The test procedure, however, is different compared to that of digital multimeters. Light tests utilize incandescent bulbs to show that there is a voltage. These work by putting the load on the circuits. This is usually not a problem, but a DMM is safer.
2. Disconnecting the battery
Now, everyone knows that if you ever need to do some tinkering with your car, you should disconnect the battery first. The only time that you should connect the battery is the time when you’re testing the wires.
This is usually done to check if there’s ground or power in them. You can also connect the battery if you’re testing new equipment just before you wrap things up.
If you leave the battery connected while you’re installing new equipment, you can damage the car or your new equipment. This is why it’s best you leave the negative cable pulled away while you’re working.

If you ever need to do some tinkering with your car, you should disconnect the battery first
If your project isn’t concerned with factory radio replacement, check if your head unit doesn’t have anti-theft protection. These kick in every time you disconnect the car battery.
If you happen to trigger it, you will require a special code for the radio to work again. This is usually located in the manual. But your local dealer’s service department can also help you out if you can’t find it.
>>> Grab your attention:
- 6 steps to disable your car's anti-theft alarming system
- Choosing the best anti-theft devices: 7 popular kinds for Pinoy driver.
3. Using a wire stripper
If you’ve ever stripped wire before, you know that any sharp object can be used to do the job. Whether it’s a razor blade, a pair of scissors, or any piercing object, it’s bound to do the trick. Although usually effective, this actually comes with a little risk that’s not worth taking.
If you used improvised cutting tools instead of a dedicated sire stripper, you'd risk cutting through the wire. While with the use of wire strippers, you can remove just the right amount of insulation.

If you used improvised cutting tools instead of a dedicated wire stripper, you'd risk cutting through the wire
>>> Check out: Essential tools needed in a car tool kit for DIY car maintenance
4. Do not use wire nuts
Wire nuts are totally fine for the electrical wiring in your home. But if you’re driving down the highway over 80 km or on a bumpy road, this simply won’t work.
Because of the relentless vibration generated while you’re driving your car, nuts will loosen up. Now, you might say that you’ve kept the nuts as tight as possible.
The problem is that every time you drive your car, the vibrations will still loosen it bit by bit. If you’re lucky, your device may just stop working. But if you’re not, your device may short out.

Wire nuts are totally fine for the electrical wiring in your home but not when driving down the highway, this simply won’t work
5. Utilize solder or butt connectors
The best method of completing DIY car wiring projects is with the use of two things. These are electrical grade solder and a soldering iron.
If you have basic soldering skills and the equipment for it, you can definitely get the job done. A dependable solder joint will keep up with the vibrations that your car gives off whenever in use. It will also keep your wires protected from oxidation.
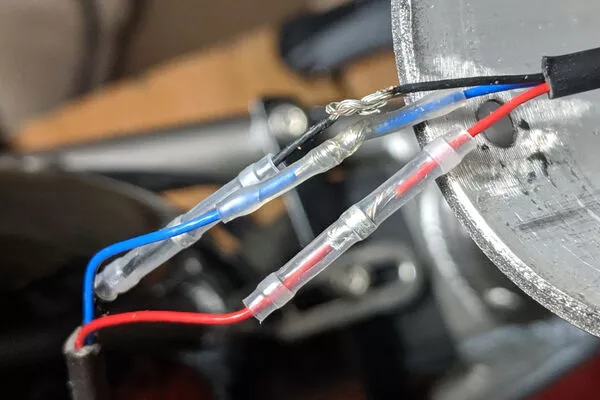
If you’re not sure how to solder, you can consider butt connectors. Butt connectors are small plastic tubes that contain a metal sleeve inside. These are used by sliding the stripped wires into the butt connector.
You then have to squeeze it with a crimping tool. This is just about the easiest method of wiring new electronics into your vehicle. The drag is that you will most likely need a crimping tool for the best results.
The best method of completing DIY car wiring projects is with the use of two things: electrical grade solder and a soldering iron
>>> You might want to know: 7 Basic Car Maintenance All Philippine Drivers Should Know
6. Insulating wire connectors
This tip here is the last, but it’s also the most important tip of all. In all of your DIY car wiring projects, always remember to insulate the connections.
As a matter of fact, it doesn’t even matter whether you choose butt connectors or used a solder. In both scenarios, proper insulation will keep your wiring in place. It will also make sure that it doesn’t fall apart or short in the next few months or years even.

There’s more to owning a car than just learning how to gas up and drive
Heat shrink is undoubtedly the best way you can insulate wiring connections. But you need to remind yourself about having to cut the tubing first.
Then, slide it over the wires just before you connect them. After that, just slide it right over the connection then heat it up. It should create a tight seal that wraps your wires. There are also soldering irons that come with a special tip that activates heat shrink tubing.
>>> There are more informative articles in our tips and advice section, don't forget to follow!


Recent posts
- 3 DIY tips to deal with moldy smells inside the car vents Aug 09, 2022
- Car maintenance: Tips for DIY pitted windshield repair Aug 17, 2022
- Car maintenance tips: 6 steps to do a proper DIY car detailing Aug 17, 2022
- Car maintenance: Common ways for DIY dent removal - Fact or fiction? Aug 17, 2022
- DIY tips to replace broken car headlamps Oct 14, 2020