If you’re new to the club, you may not be all that familiar with what tire chains are. So what’s your idea of tire chains? Do you think it’s an accessory, an upgrade or the newest trending specification on the market? Tire chains are actual chains that you attach to the tires of your car.
These chains seem to be hugging at the tire so it won’t pull off loose. However, why would anyone want to put a tire on their wheels? Find out in this article brought to you by Philkotse.com.
I. Why would you need to install tire chains?
Tire chains are made specifically to fit most car tires in the world. Their functionality lies in the traction that the chains add to the rotating power of the wheels. This traction adds a great deal of help especially for vehicle owners who live in areas where snow is a natural event of the seasons.
However, this purpose isn’t limited to snow-filled areas and roads only. Tire chains also come in very handy (and extremely helpful) if you live in mountainous areas or places where rain causes the roads to be muddy, just like the Philippines.
Installing tires on your car may not be a common sight here, but it definitely delivers a great amount of traction when you plan to drive up the steep hills and mountains of the provinces.

Tire chains are made specifically to fit most car tires in the world
II. Where to buy tire chains?
Since tire chains are not really a popular thing here in the Philippines, you can’t really find tire chains in even big auto shops that you can find on the side of the road. That fact increases the chance that you won’t find them in any vulcanizing shop off the side of the street either.
You would have to ask for them in specialty shops that actually carry them. If you plan to buy a new car, you can ask the dealership details about acquiring tire chains in case you would ever need one.
>>> Worth to note: Top 3 Tips on Getting the Best Deals on Car Accessories in Banawe Street
III. How to install tire chains
1. Step #1: Choose the right size
First off, you would want to take the right size that you need to for your tires. In order to get this part right, just take note of the long string of numbers and letters that are lined up on the outer edge of the tires. The first number should be the tire’s width; the next should indicate the tire’s height.
The last one should be all about the diameter of the wheel stated in inches. If you happen to find tire chains that are close to the measurements you have on your tire, you can always ask the store clerk.

You would need to take the right size that you need to for your tires
2. Step #2: Unpack the chains
Unpack the chains and sort out the links. After making that purchase, detangle any knotted chains in the string. This may take you a little while so it’s best to pack ample patience before doing this.
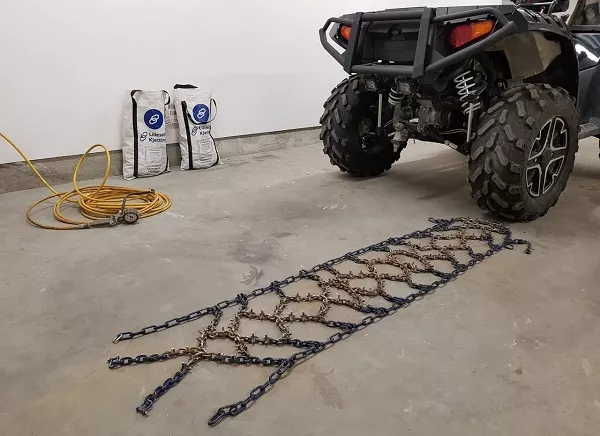
3. Step #3: Lay the new tire chains flat
Take your new tire chains and lay them flat on an even and clean surface. Your car’s drivetrain will determine which wheels you can attach tire chains to, which you can’t just randomly attach tire chains to whichever wheel.
For example, if your car is an FWD or a front-wheel drive, then you would need to install your tire chains on the front wheels. If your car is a rear-wheel drive, simply install the tire chains on the rear pair of wheels. If your vehicle is an AWD or an all-wheel drive, you should buy four tire chains – one for each tire.
In extreme weather conditions like harsh snow in the US, it doesn’t matter what type of drivetrain your car has, you can install four tire chains even on an FWD car to keep up with the extreme weather conditions.
Take your new tire chains and lay them flat on an even and clean surface
>>> Read more articles related to safe driving tips on extreme weather:
- Driving under stormy weather: A driver’s must-know
- How to reduce fuel consumption in the cold weather?
4. Step #4: Park and secure your car
Park your vehicle and secure that it would be steady and still during the whole installation. Put the chains over the top part of the tire so the rest of it drapes over.
Tuck the draping chains under the tire so it will hug the tire. Remove any obstruction you did and let your car move forward to run over the tire chain but only in a mere few inches.

Park your vehicle and secure that it would be steady and still during the whole installation.
5. Step #5: Start
Once you’re sure that the distance you moved forward was enough for the tire chains then it’s now time to start securing it. Use the steering wheel to turn the wheels inside so you can have a better angle and see what you’re doing.
If you’re not sure which direction to turn your wheels inward to, simply follow this rule, if it’s the tires on the left side of your vehicle, turn the wheels right.
Safety First: 8 Steps to Installing Winter Tire Chains
6. Step #6: Connect the end and the beginning part
Once you have the best access to what you’re doing down there, it will now be easier for you to connect the end and the beginning part of the chains.
Remember to start from the inside so it would be easier for you compared to reaching out from the outside to the inside when locking it. Start by connecting the two edges that had hooks then do the same for the outside portion of the tires.
7. Step #7: Tighten it
You are now on the part where you need to tighten your project to maximize its utilization. Your tire chain can come in a variety of ways to tighten it. Some common brands on the market can be tightened by rotating a piece somewhere in the links. However, there are also traditional types that require specific tightening tools.

Your tire chain can come in a variety of ways to tighten it
8. Step #8: Inspect what you've done
Take a step back and visually inspect what had become of your hard work. The inner and outer part of the chains should look even and aligned on both sides. If you see that they’re somehow not pleasing to your eye then set to work and repeat the process from when you think things got a little out of hand.

Inspect if you've installed the tire chains correctly
9. Step #9: Repeat and repeat to the rest of the tires
Once you’re happy with how you finished with the first tire, it’s now time to do the same step to the rest of the tires. Simply repeat what you did to the first one and if there’s anything that goes wrong, redo it.
After all, it’s better to repeat what you had to do and finish it successfully, rather than finish off with an unsuccessful result then regret the consequences later.
Follow Philkotse.com for more useful car maintenance tips and keep your beloved vehicle in healthy condition!


![[FOR FUN] Top 5 anime series that car enthusiasts will love](https://img.philkotse.com/crop/94x52/2019/11/06/xgWRvxxG/top-anime-for-car-lovers-5c8c.jpg)


